
I am guessing you are here because you want to start a blog!?
Woohoo!
That is great news.
Blogging can be a great creative outlet and hobby and in some cases, a great source of passive income.
A word to the wise
Don't get stuck on your name, pick one, and move on.
Trust me. (I wrote all about my name picking issues and my blogging journey so far. If you missed it, make sure to check it out!)

Also, just know that you will have to learn a lot, and you have to pay attention to every little thing.
Even if you are scrolling Facebook and stumble upon a thread in a blogger group, if you have no clue what they are talking about, quickly jot it down and make it a priority to learn all about it.
I have learnt so much that way, by just paying attention.
Also, blogging IS NOT a "get rich quick" thing. So don't start a blog for the money. Start a blog because you truly have a passion for whatever it may be, and you want to share that passion with others.
Although, to be real with you, I did start blogging with the full intention of eventually turning it into a business. But I started all of this because of my passion for food and cooking, and wanting to share that with the world!
I have put thousands of hours into blogging and learning about blogging before I even pressed publish on my first post. All of those hours were unpaid soooo… just expect to be working for free for the first bit.
So, if I haven't scared you off yet, let's get into this!
This is a guide to help you start your own food blog! (Or any blog)
All of these steps to starting a blog are not specific to food blogging, you can follow these easy steps to have any blog up and running in just a few minutes.
A few Housekeeping tips
Self Hosted vs. Hosted Platform
What does this mean?
A self-hosted blog means you have to purchase a domain and pay a hosting company to host your website on their servers. These charges are typically paid yearly and can increase over time as the traffic to your website grows.
Using a hosted platform for your blog means that it is typically free (or very low cost) to set up your website. Hosted platforms are pre-designed and hosted through a company (wix.com is an example of a hosted platform). These types of blogs come with a plethora of limitations and eventually if you want to monetize your site, you will need to switch to a self-hosted platform anyway.
So, I suggest starting with a self-hosted blog right off the bat. The self-hosted platform that is the most popular and the one that I use is wordpress.org (not to be confused with wordpress.com, which is a hosted blogging platform, confusing? Just a bit…)
Starting with a self-hosted blog will allow you to be able to learn from ground zero and you will gain a greater understanding of how the backend of your website operates. It will give you unlimited access to growing your blog and creating it into exactly what you want it to be.
All that being said, this article will teach you how to start a Self-Hosted blog on wordpress.org.
Follow these 3 steps and have your website up and running in under an hour!
- Purchase a Domain Name and Hosting
- Integrate your hosting and domain with WordPress.org
- Install a theme to make it look pretty
Purchase a Domain Name and Hosting
First things first, what the heck is a domain name?
A domain name is the name of your website and it is what shows up in the URL. Something like this; myawesomeblog(dot)com.
So, before you go any further you'll have to choose a name for your blog.
The name that you choose for your blog should be your domain name, too. So take that into account when choosing a name, you don't want to confuse your readers by picking the name "my awesome blog" and having the domain name be "mysuperfantasticblog(dot)com. See what I mean?
Domain Name No No's
- Make it straightforward and easy to read. Avoid using words that will cause double lettering, ex. jesssugarrush(dot)com. This can be difficult to type and could confuse your readers, so it is better to steer clear of double lettering if you can.
- Always, always, always try and get the .com version. This is the most widely recognized version (a top level domain), which is what you want.
- Try and avoid names that are similar to popular well established blogs. What I mean by this is don't copy your favourite bloggers name and add an "s" to the end, or something like that. This can make it impossible for your website to rank in google later on and will confuse your readers.
- Try not to change your name. It is best to pick a name and stick to it. Rebranding is a hard process and it can really confuse your readers.
Now onto the fun part!
Now that you have your blog's name picked out, and you have checked that the domain is available it is time to purchase your domain and hosting package!
The hosting company that I LOVE and highly recommend is SiteGround. The first blog I started was with a different hosting company, and you can just say that left me very "blue". It was just a bad experience and hard to navigate, that is one of the reasons I walked away from my first site so easily.
SiteGround is highly rated in the blogging industry and it has great reviews.

They are affordable and the customer service is AMAZING.
Once you are on their website, navigate to the "hosting" section at the top and click on the "web hosting" option.
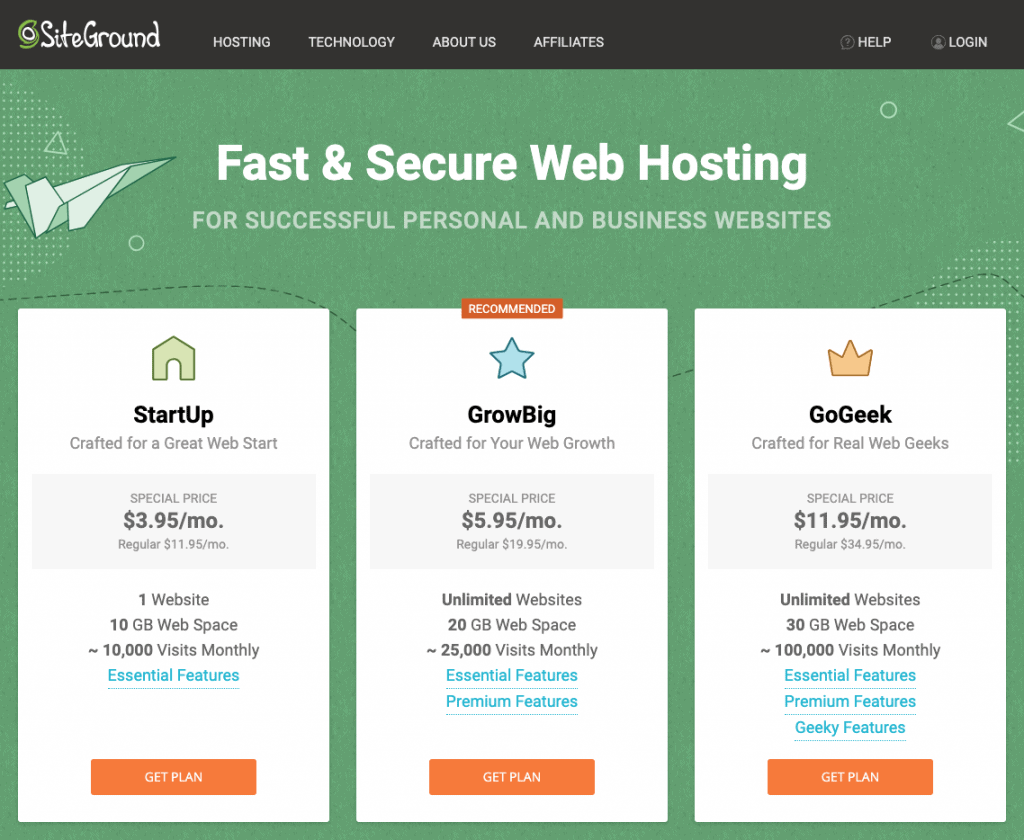
This is where you will choose your hosting plan.
If you are just starting out and have no social following at all, the StartUp plan is a good option to start with.
It is really all you need when you are first starting out and it is super easy to upgrade your plan at any time in your account.
Choose the plan that works for you and click on "get plan"
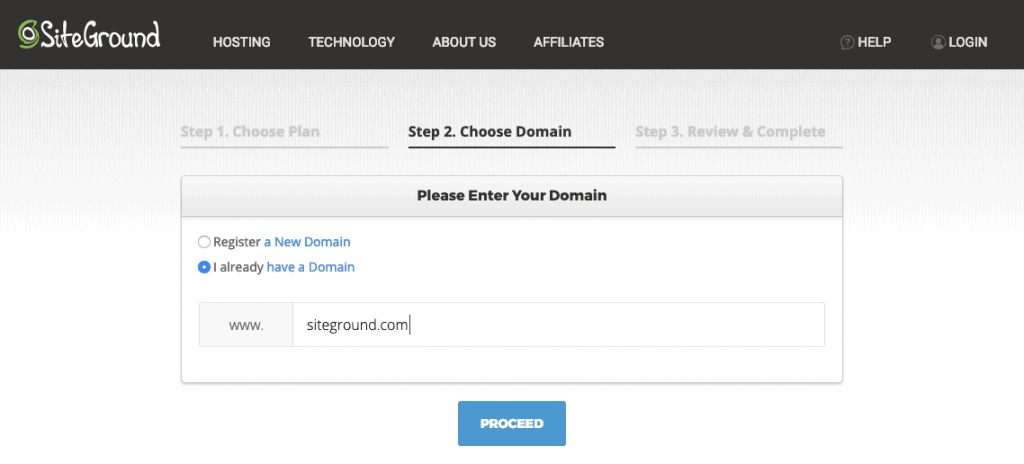
Now, you will have to purchase the domain that you selected earlier. If you are purchasing the domain for the first time, click "register a new domain". If you already purchased the domain elsewhere, click the "I already have a domain".
Save This Recipe! 💌
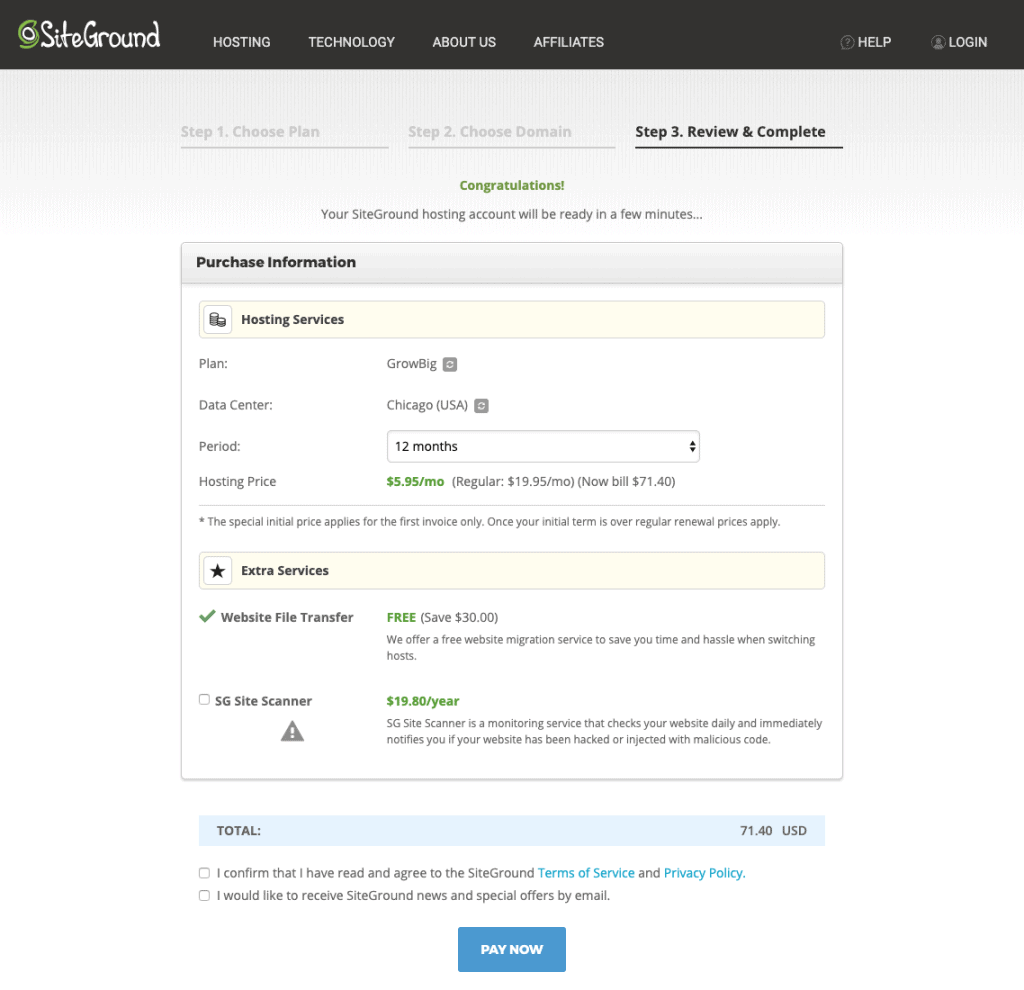
Next, you will review and confirm your order.
Additional Services
I do recommend adding on the services "SG Site Scanner" and "Domain Privacy".
SG Site Scanner is a service provided by SiteGround that regularly scans your site. It will notify you if it finds any malicious code or if your site has been hacked. Thankfully, I have never had any issues with this, but for me it's having the piece of mind that something is looking out for these kinds of attacks on my behalf.
Second, domain privacy, the service "Domain ID Protect" that SiteGround offers will protect your personal details from being publicly accessible in the WHOIS database. It makes the contact information related to your domain name private and unaccessible by the public.
Congratulations, you have now purchased your web hosting and a domain for your website!
Integrate your hosting and domain with WordPress.org
Now, you have to marry wordpress.org with your web hosting.
That can be done in a few ways and takes about 5-10 minutes to set up.
As soon as you log into your new SiteGround account you'll be greeted by a pop up to set up your new site.
Select "start a new website" and select "WordPress" as the software to install. Follow the prompts to set you username and password. This is the username and password that you will use to log into WordPress, so don't forget them!
Then you will be taken to a page to complete the setup, once that is done, you officially have WordPress installed on your site!
To login to your new site, in a new browser window, type your full domain name in the URL and follow it up with "/wp-admin". This will take you to the login to get into your WordPress dashboard. Enter the credentials you chose above and voilà, you're in!
That's it! You're logged into your new blog! Welcome to the crazy world of blogging, my friend!
Picking and installing a theme
A theme is what makes your website pretty.
It is a prewritten code that is applied to the backend of your website and in turn makes the front end of the site look organized, easy to read and presentable.
There are a TON of both paid and free themes available.
After you first setup your website there will be the standard theme installed by wordpress, but you can change themes easily at any time.
Applying a Theme to your website
1.Log into your WordPress dashboard and navigate to the "appearance" section, hover your mouse over and click on "themes"
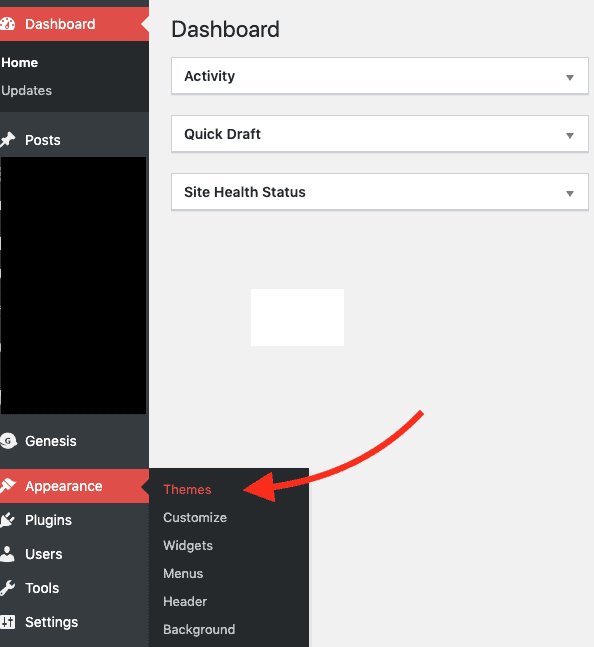
2. This will show all of the themes that are installed on your site. Click the "add new theme" box to be taken to the next step.
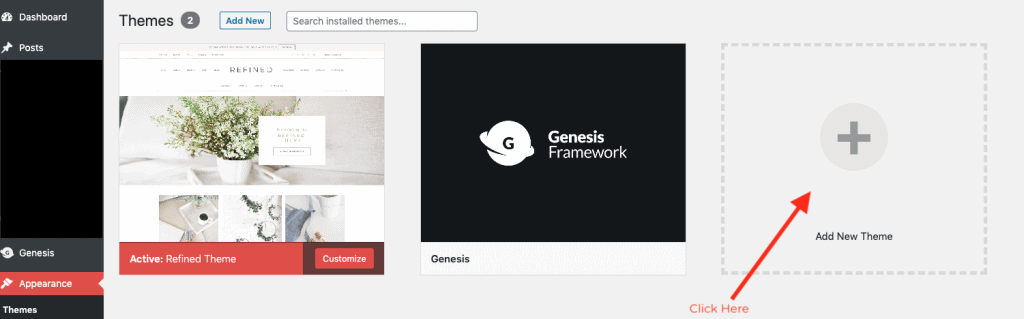
3. This screen shows you a variety of themes that are available. Instead of scrolling through here, I suggest you do some research on google first to find a theme that will suit your site. Then use the "search themes" box to find the theme or if you purchased a theme, click the "upload theme" box to add the theme to your website.
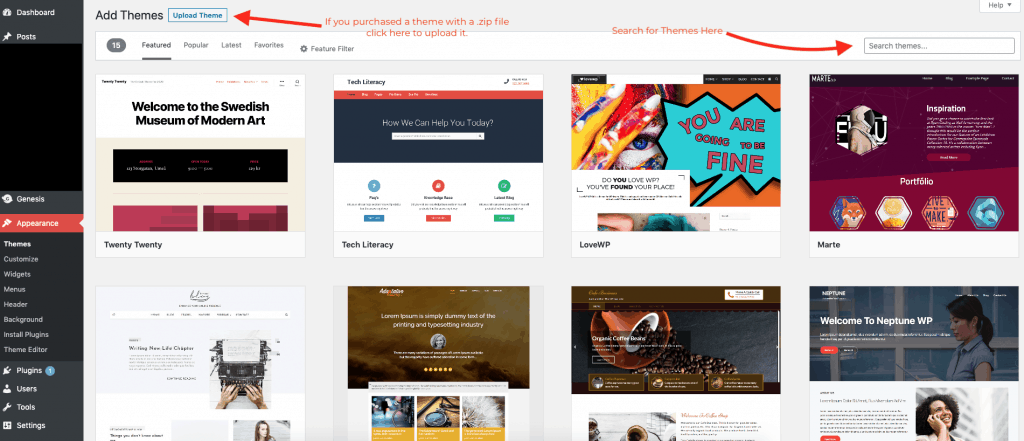
4. When you find the theme, click "install" and then "activate" and the theme will be active on your site. There is a "preview" option too that can be helpful when choosing your theme, as your mouse hovers over the themes, the opinions to "install" or "preview" will pop up.
What Whipped It Up uses
On this site I use the Restored316 theme, called Refined and it is run on the Genesis Framework.
The Genesis Framework is very affordable and after you buy it once you never need to buy it again!
I can not say enough good things about the team over at Restored316 and the Genesis Framework. They both provide incredible customer service and I have never had any issues with either of them.

Free vs. Paid Themes
It is totally fine to start with a free theme when you are just starting out, just know that in order to monetize your site, you will need to upgrade to a paid theme.
As far as free themes go, I have used and would recommend LyraThemes. I used the "Kale" theme for the first whole year on my blog with no issues.
Important note- You can add your own coding to a theme, but I do not recommend doing this unless you a) know what you're doing or b) hire a professional to integrate the code for you. Adding customized code can break your website if you don't know how to do it properly (trust me, first hand experience on this one). Also, if you add your own code, every time the theme is updated, the code will have to be reapplied.
The Books I Read Before I started a blog
If you have read my blogging story, you'll already know that I was studying blogging for a LONG time before ever pressing publish.
These are three of the books that I read (a few times now) and they all taught me so much!
The first one I ever read was "Food Blogging for Dummies" by Kelly Senyei. It is more like a textbook that teaches a lot of the blogging principals, and while the blogging world has evolved since this was written, it still provides lots of valuable information to first time bloggers.
Another one that I read at the very beginning was "Will Write for Food" by Dianne Jacob. This is a great book that illustrates professional food writing, it also includes valuable information about running a food and recipe site. But trust me, writing concise, easy to read recipes is something you will need to know how to do right off the bat.
Another one that I would recommend over and over again is "The 4-hour Work Week" by Timothy Ferris. It is an inspiring read for anyone who is an entrepreneur, trying to create a business or a side hustle. It is not specific to blogging, but it teaches tips of efficiency that can easily be applied in your life. All in all, it is a very energizing read for people interested in entrepreneurship.
Whew! We made it! I hope that I was able to help you start your own blog, and I hope that you are excited for this journey!
Every second Wednesday I will be sharing a new "blogging" post, sharing all sorts of tips and tricks that I have learnt along the way. If this sort of thing interests you, I hope you follow along!
If you have any questions about blogging or setting up your own website, feel free to leave a comment down below or email me directly and I will do my best to help you in any way that I can!
mtrinhtrieuan says
thank for share
so delicious!!
Dianne Jacob says
Thanks for including my book in this resource-filled post!
Jessica says
You are very welcome! Thank you for writing such a great book!❤️
Triều An says
yummy!!!